
Showing posts with label Baking. Show all posts
Showing posts with label Baking. Show all posts
7/18/2016
Melie's Kitchen + A Recipe You Need In Your Life

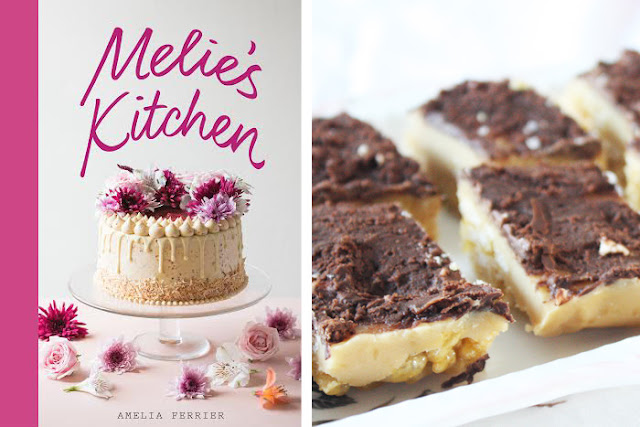
-Cover Photography image c/o Tam West and Penguin Random House, Recipe photo x Nana Wintour
If you're a bit of a baking enthusiast and are one of those people who loves having pictures of stunning, edible creations in their Instagram feed, you will be familiar with Melie's Kitchen. Amelia Ferrier is the talented young lady behind the 'grams and what are quite frankly amazing looking cake creations. She's recently released her first book, also named Melie's Kitchen. It's absolutely stunning and as well as her cakes, there's a range of biscuits, slices and savoury creations featured throughout.
Today I've partnered with Penguin Random House* to bring you one of the recipes from Melie's Kitchen. It's one I made myself last week and it tastes amazing. In fact, it was only around in our pantry for less than 24 hours after I made it. For the most part it's very easy to make but if you're new to making homemade marshmallow, be patient. Mine didn't work out so I ended up abandoning it from the recipe. Otherwise, this isn't too tricky.
Here's the recipe for Puffed Rice, Peanut Butter Fudge and Marshmallow bars. Let me know if you end up making these! I'd love to see your creations as well. Anyway, recipe is below:
For the puffed rice base
2 cups puffed rice
¼ cup caster sugar
35g honey
35g golden syrup
70g butter
1 tablespoon milk
¼ teaspoon salt
For the peanut butter fudge
¾ cup icing sugar
25g butter, cubed
½ cup brown sugar
¼ cup cream
¼ teaspoon salt
¼ cup smooth peanut
butter
For the cocoa-swirled marshmallow
4 tablespoons cold water
1½ teaspoons powdered gelatine
½ cup caster sugar
pinch of salt
1 tablespoon premium Dutch cocoa powder, sifted
To decorate
250g dark chocolate (50% cocoa), roughly chopped
⅓ cup roasted salted peanuts, finely chopped
flaky sea salt
(optional)
Grease a 20cm
square slice tin and line with baking paper. Line a chopping board with baking
paper. Set aside.
To make the puffed
rice base, put the puffed rice in a large bowl and set aside. In a medium
saucepan over a medium-high heat, stir together the sugar, honey, golden syrup,
butter, milk and salt, and bring to a boil. Boil for 2 minutes, stirring
occasionally to prevent burning. Remove from the heat and immediately pour over
the puffed rice. Quickly fold into the puffed rice and spoon into the prepared
tin. Press down firmly with a spoon or the base of a measuring cup, making sure
the surface is level. Refrigerate while you make the peanut butter fudge.
To make the peanut
butter fudge, put the icing sugar in a large bowl and set aside. Melt the
butter in a small saucepan over medium heat. Stir in the brown sugar, cream and
salt, and bring to a boil. Boil for 2 minutes, then remove from the heat. Whisk
in the peanut butter. Pour the mixture over the icing sugar and stir thoroughly
to combine. Pour over the puffed rice base and spread out evenly. Gently tap
the tin against the bench a few times to level out the surface. Chill in the
freezer while you make the cocoa-swirled marshmallow.
To make the
cocoa-swirled marshmallow, put half of the water into a small bowl. Sprinkle
over the gelatine and set aside. Combine the sugar and remaining water in a small saucepan over a
medium heat and stir until the sugar has dissolved. Whisk in the gelatine and
bring to a boil. Remove from the heat and pour into the bowl of a stand mixer
fitted with a whisk attachment. Add salt. Whisk for about 4–5 minutes, until
soft and doubled in volume. Fold in the cocoa powder to create a marbled
effect. Spread over the peanut butter fudge and leave to set in the freezer for
about 30 minutes, until the marshmallow is firm enough to hold its shape when
cut.
Remove the slice from the tin and peel off the baking paper. Using a knife dipped in hot water, slice into bars roughly 4cm x 10cm. Refrigerate while you melt the chocolate.
Put the chocolate into a heatproof bowl over a pot of simmering water. Heat gently, stirring occasionally, until fully melted. Remove from the heat and pour into a small but deep bowl. Dip each bar into the melted chocolate, using two forks to help lower them in and out of it. Lift each bar out and carefully tap against the side of the bowl to allow the excess chocolate to drip off. Place on the prepared chopping board and carefully sprinkle over the chopped peanuts and a little salt, if desired, don the middle of the bar. Refrigerate for about 20 minutes, until the chocolate has set.
If stored in an airtight container in the fridge, these bars will keep for up to a week.
*This post is in no way sponsored however I did receive a copy of Melie's Kitchen and was provided
the recipe by Penguin Random House. All love of sweet treats and baking in general are my own.


12/18/2014
Peppermint Chocolate Bark
I wish this photo had a scratch and sniff function because you'd be wanting to devour the chocolate bark you see. It's Day 6 of Blogmas and we're all heading to the kitchen and cooking up something tasty and festive for you all. I opted to make Peppermint Chocolate Bark which I'd seen on Pinterest a few times. This seems to be quite the American thing. It's super easy to whip up and requires next to no effort but it still looks great and tastes delicious. If you want to find out how to make this then keep reading..
What You'll Need:
1 cup of Oreo cookies (chopped). *For reference, I got the box in NZ supermarkets which has several tubes and I think I ended up using all except one or two of the tubes inside it.
1 cup Milk Chocolate Chips. *I used the Cadbury ones because they're the best in my opinion.
1 1/2 Cups White Chocolate Chips. *These seemed harder to find so I just bought some Cadbury white chocolate buttons.
10 Mini Candy Canes (crushed), about 1/2 cup.
A cake tin. *These may not be called cake tins but y'know the things you cook brownies or slices in? Them.
A sheet of cooking paper.

Steps:
-Melt your milk chocolate chips until smooth and pour over the baking paper. Sprinkle with the chopped Oreos and place in the fridge to chill for ten minutes.
-Melt your white chocolate until smooth and pour over your oreos and milk chocolate layer. Side note: White chocolate seems to melt a lot faster so keep it on a lower temperature if you want to slow the process slightly. Add the chopped candy cane pieces on top and place in the fridge to chill until set. I found about 10-15 minutes was fine.
-Break up your bark, eat, serve, gift and enjoy! This is really so simple, it's probably not right to even call it a recipe but it honestly tastes so good I just had to mention it.
*Do you have any Christmas recipes you love?


11/20/2012
Current Spring Favourites by Avenue M
Hello Nana Wintour readers,
My name is Maria and I write for the blog, Avenue M. It's my personal style diary along with photography, food and adventures. I'd love it if you'd stop by sometime soon.
This is just a little compilation of all my favourite things for the month of November.
Lots of love, Maria xoxo

Carrie's gorgeous pink-and-black pairings make this outfit a winner for me. I love the statement collar and high ponytail, she looks effortlessly stylish -- not to mention comfortable! I'm also loving delicate, sheer blouses with quirky details. I love the subtle scalloping on this one as well as the pretty breast pockets.
And, how good does the apple crumble slice look?! I've had this once before in a cafe but never thought about making it myself. I stumbled upon this recipe however and really want to make it... yum!

Jewel toned makeup, food and accessories. Keiko Lynn perfected the red lip to the max... I love that rich, deep red! Those macarons look very tempting too, as well as that salmon coloured bag. I love colour!

♥ ♥ ♥
Thanks so much for having me Sophie!!
Thanks so much for having me Sophie!!

10/01/2012
Monday Marvel #16
So today I thought I'd share one of my new favourite dessert recipes with you. As always it is very easy to make & is super healthy+delicious, although if you want to make it more indulgent you can serve it with ice-cream & chocolate garnishes, as we did.
So here it is, today I bring you the Mango Passionfruit Pot, doesn't it look amazing? We served them in teacups but you can also use small glasses as well.
Read More
So here it is, today I bring you the Mango Passionfruit Pot, doesn't it look amazing? We served them in teacups but you can also use small glasses as well.

Click through for the recipe!

6/26/2012
Culinary Delights: Lamington Cupcakes

I love baking. There's something so rewarding about making something yourself and then sharing the results with others. I love surprising people with baking too. Today I'll be making these for a friend who's celebrating a birthday soon.
This recipe comes from Donna Hay magazine. It is quick & super easy to make, which thankfully most of Donna's recipes are. You'll love these, your friends will love these & your family will love these. Don't be surprised if people start going through your cookbooks, snapping photos of as many recipes as they can.
Anyway, without further ado I bring you Donna Hay's Lamington Cupcakes!
Subscribe to:
Posts (Atom)


